Pages

Thursday, July 28, 2011

Birthday Apron


My daughter got invited to a birthday party. The invitation came in late last night. Late. The party is tonight. I almost didn't send my daughter, simply because I didn't have a gift, and haven't had time to pack two kids and a baby in the van to run to the store today. This little project took 30 minutes.
This is what I started with:


I love this cute fabric from Joanne's! We will also give her a brownie mix :)

This is what I ended with.


I don't have time to post the tutorial now, but hope to get to it some time in the next few days. I am off to see a dear friend tonight, who is in town from London...

Have a great night!

Risa

Wednesday, July 27, 2011

READING SUBWAY ART {printable for you}

The baby is napping, and I have been playing on the computer for the past hour. I am getting ready for BACK-TO-SCHOOL with my kids, and thinking about inspiring them in their schoolwork. I came up with READING THEME SUBWAY ART printables. I plan to frame and place in each of their rooms. I thought I would share with you as well.

Here is the girlie one...

For printable format, click HERE. After pulling it up in scribd, click the green download button found on the right side of the black bar near the bottom. You will be able to download it from there.

And, for the boy...

For printable format, click HERE. After pulling it up in scribd, click the green download button found on the right side of the black bar near the bottom. You will be able to download it from there.


You can make your own subway art in picnik, by picasa. All you have to do is play with the text. There are SO MANY to choose from!

Please let me know what you think.
I LOVE and APPRECIATE each and every comment I get.

Have a Happy and Creative Day!

Risa

Wednesday, July 20, 2011

More Burp Cloths

It seems as if everyone I know is having babies right now, and especially boy babies! Here are a few more burp cloth gifts I have made over the past couple days.

This one is for my new nephew, baby Seth. He is so darling. I just met him tonight for the first time. He has a ton of hair. Cute, cute :)


This is for baby Everett, whom I have yet to meet. I did see a pic on facebook today, and he is, "Oh so cute!" I tore all the edges on this one, and I really like how it turned out.


This one is for baby Fin. He is darling as well. (And, I love his name!) I know the dot on the "I," is crooked, but it adds to the character - right ;)


Finally, this is for cute baby Annalia, who I get to meet in a few weeks. I thought this one was fun and different for a baby girl.


Anyway, just thought I would share!

Have a Happy and Creative Day!

Risa

Sunday, July 17, 2011

Kokeshi Doll Tutorial

For my daughter's
Japanese Themed Birthday Party
,
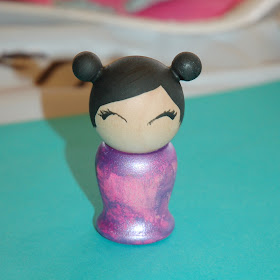
I knew I wanted each girl to have a kokeshi doll. I searched online, and in local Asian markets for a cute doll at a good price. The cheapest I found before shipping, was $6 per doll. These dolls were small, and not very cute. I knew I could make one. I used the the printables I found for the party as my guide for how I wanted the hair, body, faces, and basic proportions. You can see the printable source by clicking the link above.


This is what I started with:

SUPPLIES:

HEAD - Ball Knobs 1 1/4"; 3/16 hole
(I tried it with the 1 1/4 " dowel caps. This doesn't work, as you need to screw the head to the body. The dowel hole is too big.)
BUNS - 1/4" dowel caps, and 3/8" round balls
BODY - 1 1/4" 5/8" hole candle cups
E600 Craft Glue
Craft Paint
Screws
Floral Foam, Craft Paint, Paint Brushes, Dowels, and Toothpicks

*UPDATE*

It has come to my attention, that some of you may not have be able to find these supplies. So, if you need to order them online, I have tried to make it easy for you, and here is the link. You can just click on each one to take you to the item on their website:

Heads:

http://shop.hobbylobby.com/store/item.aspx?ItemId=158112

Bodies:

http://shop.hobbylobby.com/store/item.aspx?ItemId=158114


Buns:

http://shop.hobbylobby.com/store/item.aspx?ItemId=158175

http://shop.hobbylobby.com/store/item.aspx?ItemId=158294


DIRECTIONS:

Place the ball knobs on dowels, and stick the dowels on foam (from the dollar store.)

Paint the faces first. That way if you mess up, you can paint the hair over the messed up face. I did many times! I bought paint pens, thinking that would work, but it didn't. The paint pen ran, and it looked like a mess. My friend Tiffany told me to paint the faces with a toothpick dipped in craft paint. That was a great tip! You can visit Tiffany's etsy shop here. She has darling, darling things, and is very talented!

Paint the Hair. I used the toothpick the make the basic hair lines, and then a paint brush to fill in the rest.

Glue the buns on wherever you want them. I thought it was fun to put them in different places on the head. It added nice variety. You may need to hold them in place as the glue dries. I glued the buns on after painting, to insure that all you see when you look at the doll is black hair, and not unfinished wood under the glue. I didn't know if the glue would be very paintable.


Paint the Buns after the glue is completely dry. I also filled in the empty glue spots with a toothpick full of glue, so the glue would take up the empty space. I even added more glue after painting, then painted again. I just used a brush to paint the buns.


Here are all the doll heads.

I didn't paint mouths. I did a few with mouths to begin with, and I thought it distracted from the overall look and cuteness.


Screw the head and body together. My husband used his vice when he did this for me, but it left little marks on some of the dolls faces even thought he put a towel between the doll and the vice. You know how husbands are :) I think he really was excited about using his vice. I don't think it would be necessary. He was nice to do it for me though.

Here is one with a mouth. The mouth is cute on this one, but wasn't cute on all of them, and I ended up having to paint over it enough, that is wasn't even worth it.


Here are some of the finished dolls:
(Like I said in my Japanese Party Post, I wish I would have sprayed them with spray varnish after the girls painted them, but I got too busy at the party, and didn't remember :(

You can see the eyes are all different, and not perfect. The girls had a great time choosing the doll and hairstyle they liked best.

I loved the metallic paint they painted the bodies with - so cute! The girls were great little painters, and I think... the messier the better.



If you like this post, PLEASE leave a comment!
I love and appreciate comments, and read every one.

Have a Happy and Creative Day!!

Risa

I am linking!


Friday, July 8, 2011

PERSONALIZED STAMP & Winner Announced!!!

First things first... Thank you to all my awesome followers who entered the giveaway. Your comments are always so nice! The WINNER of the
Travel Kit Giveaway
is...

Charity!!!

Charity, please send my an e-mail with your address, and I will get your travel kit shipped right away! Thank you, thank you! risabaker@gmail.com

I don't know how other bloggers are able to print the random generator box. All I could do was this:

True Random Number Generator 18 Powered by RANDOM.ORG

I did put in the range of 1 to 28, for all the comments. I don't know why it is showing 1 - 100. Maybe someday I will learn. Anyway... congratulations Charity! I hope you like your travel kit!

Second things second:

I wanted to introduce you to one of my favorite things...

MY PERSONALIZED STAMP


I have wanted a personalized stamp for a long time. I have a cute friend who has one she uses on her baked goods every time she brings you anything. I got my rubber stamp made on etsy. Of course I chose the Russian doll! The etsy store is called
MY RUBBER STAMP.
Check them out, they have a large variety of products to choose from. I have a large stack of all sorts of colors of circles and scalloped circles in addition to a bunch of colors of tulle, in my cupboard, waiting to be stamped and used. I even use the stamp when I give someone a loaf of fresh baked bread. It is truly one of my favorite things. I want to order one that says, "From The Kitchen Of..." next.

When friends have babies, I like making and giving them a burp cloth. Here are a couple of the burp cloths I have made, all wrapped up with my cute personalized stamp label!

This fabric is from Hobby Lobby. It is one of my favorite of their lines.


This fabric is from Joann's. I fell in love with the little birdies, and had to have it!


I had this fabric in my craft closet. I made this one for baby Winston. Cute - right? :)


Have a Happy and Creative Day!

Risa


Thursday, July 7, 2011

SUMMER SALAD {Couscous and Feta salad}


In the summer, I LOVE having a different cold salad in the fridge every week. This week, I tried a couscous salad. My fabulous sister-in-law Angie, made a couscous salad for a 4th of July family party, so I thought I would give it a shot. I found this recipe on allrecipes.

Couscous brings me back to when I used to work at the middle eastern restaurant I mentioned in my FALAFEL post.

Here is the recipe:

COUSCOUS FETA SALAD
  • 2 cups water
  • 1 1/3 cups couscous
  • 1 teaspoon salt
  • 1/2 teaspoon ground black pepper
  • 2 tablespoons red wine vinegar
  • 1 1/2 tablespoons Dijon mustard
  • 1/2 cup olive oil
  • 1 cucumber, seeded and chopped
  • 1 (4 ounce) container crumbled feta cheese
  • 6 green onions, chopped
  • 1/2 cup chopped fresh parsley
  • 1/4 cup toasted pine nuts

Directions

  1. Bring the water to a boil in a saucepan over high heat. Remove from the heat, and stir in the couscous. Cover, and let stand for 10 minutes. Scrape the couscous into a mixing bowl, fluff with a fork, and refrigerate until cold, about 1 hour.
  2. Once the couscous is cold, make the dressing by whisking together the salt, black pepper, red wine vinegar, and Dijon mustard in a small bowl. Slowly drizzle in the olive oil while continuing to whisk until the oil has thickened the dressing. Fold the cucumber, feta cheese, green onions, parsley, and pine nuts into the couscous. Pour the dressing overtop, and stir until evenly moistened. Chill 30 minutes before serving.
I did a few things different. I didn't add all the whites of the onions, as I didn't want it to be too oniony. I think I may have added extra feta. I didn't measure. I just spooned it out of my large container from Costco.

Also... you may be thinking pine nuts are too expensive. They are expensive. I buy a large bag from Costco for about $22. I keep it in my freezer, and pull out a tablespoon or so every week, to toast, and throw in a green or pasta salad. They add such great flavor to any dish. If you do it this way, it will take you a long time to run out. To toast, place nuts in a dry frying pan, and cook over low to med heat, until golden, turning constantly. You will be happy about spending the money on them once you see how far they go.


So, I was worried, that only adding 1 1/3 cups of couscous to 2 cups of water wouldn't make enough... I was SO WRONG! it makes a ton. Probably eight, one cup servings, maybe more. I should have measured.

A little info about Cousous:

Couscous is a good source of protein, fiber, niacin, selenium, and B vitamins. For those looking for added health benefits, whole wheat couscous provides the additional fiber and protein of whole grain wheat. However you enjoy it, couscous is an all–natural source of several nutrients we require daily including protein, a perfect fit for today's health–conscious consumer. For additional information, see the Source.

Have a Happy Yummy Day!

Risa

Sunday, July 3, 2011

Food for the 4th! & The best frosting on the planet!

I know, it's weird... I am posting twice in one day. I wanted to do it before tomorrow.

This post was going to be all about 4th of July food. It is about that, but I think I may have found the best frosting recipe on the planet.
I AM NOT KIDDING.
I think this post will be a lot about that too!!! I am the kind who doesn't always eat the frosting on cake or cupcakes, or I prefer whipped topping or some other kind of sauce. Today, I was making this cake pictured below. I got the inspiration for the cake and the frosting on Remarkable Home. It is called flour frosting. I am not kidding when I say... I want to eat the frosting with a spoon!


I decided to frost the cake like this, as I didn't want to cover up the festive colors, and the frosting molds so well!


I just used white cake for the batter, divided it in 3, and added color.

So, the link to the frosting is listed above. You should try it. I bet you will never go back. I told my mom about it, and she said she has my grandma's old recipe, and that is the only frosting she ever remembers eating on red velvet cake. I bet it is delish on that, or any other kind of cake for that matter. When you eat it, you wonder if you are eating cream. Really, you do, and the consistency is the same. It is silky and smooth.

Okay, enough about that...

We are also having patriotic jello. What summer BBQ would be complete without jello? Oh, and I made the little flags, using skewers and patriotic scrapbook paper I got from Hobby Lobby.


And, I make these every year on the 4th of July, because they are so pretty, and tasty!
They are cherry bars. I got the recipe from old friends and neighbors, Suzanne and Wendy, where I used to live. Everything they ever made was always SO YUMMY, and these don't disappoint!


Cherry Bars

1 cup real butter
1 3/4 cup sugar
4 eggs
1 tsp vanilla
3 cups flour
1/4 tsp salt
1 1/2 tsp baking powder
1 can of cherry pie filling

Cream butter and sugar. Add eggs and vanilla. Stir up and add dry ingredients. Spread 2/3 of batter into a 11 1/2 X 15 1/2 jelly roll pan. (I didn't have one, so I used a cookie sheet, and it worked fine.) Spread 1 can of cherry pie filling over top of batter. With a spoon, drop remaining batter over the top of the cherries. Baker at 350 degrees for 30 minutes. Top with frosting.

Frosting

1 1/2 cups powdered sugar
3 Tbsp butter
1/2 tsp vanilla
enough milk to bring to a, "drizzling," consistency.
(I also added zest on 1 lemon, and lemon juice in place of part of the milk.)

Drizzle over baked cherry bars.

I hope you are having a fun 4th of July weekend. Mine has been great so far!

Have a Happy and Yummy Day!

Risa


FAIRY HOUSES for outside...

Have you ever been in your yard and thought... "I bet a fairy would love to live under that bush." Or, "I bet a fairy could make a nice home by those flowers?" Well, I like to talk about where fairies would like to live with my kids when we do yard work together. We talk about if a fairy would live here or there, or what flowers they would prefer. This is also fun to do on hikes!


I had a while where I was a little obsessed with fairies, and I built my daughter an amazing fairy house for her birthday. It was before I started blogging, and the photos are not fantastic, but maybe I will share them with you some day :)

At Michael's Crafts, you can pick up these wooden doll furniture pieces for $.99 each. They are a great deal. I used some of them in my daughters fairy house. My daughter and I thought it would be fun to put a few around the yard for the fairies that live by us. So, we got out our paint brushes, and got to work.

This is what we started with. $3 total.


My daughter painted this one for the bedroom. I already had the bed I made for her fairy house, as well as the vanity and other accessories.

This is the gardening room, because, everybody knows... fairies love to garden!


Here's the gardening room from a distance. See the Foxglove in the top corner? I once heard a small girl at a nursery tell her mom that she loved the fairy fingers. That's what we call them now too :)


Here's the craft room. It is also patriotic, since we made these on the 2nd of July. This is where they make their clothes.


Here is a close up of the craft room. See the miniature wooden spool with the blue thread? Darling!


This is a piece I made for my daughter's fairy house. It is kind of old, you can tell. I made the table by gluing pieces of pine cones in a wooden box I got from a craft store. I made the chairs by gluing random things I found at the craft store, and painting them. See the acorn bowls??? I LOVE them :)


Here's how the kitchen looks from a distance. When it was early spring, we had a yard full of mushrooms, because it was so wet, and such a long spring. It would have been fun to put the little pieces of furniture around a mushroom {table} already growing in the yard (as long as the kids don't touch or eat it!)


I hope the fairies will enjoy it! I know my daughter and I have!

Have a Happy and Creative Day!

Risa

I am linking!