I just finished this project up, and am so excited to replace my not-so -attractive plastic hose caddy with this pretty little DIY project, that was finished in no time! All my supplies came from Home Depot. My husband offered to do this project with me. And we had a great time! I love doing projects together!
You will need:
4X4" x 8' post (cut in half) Home Depot will do it for you.
4" turned bun foot
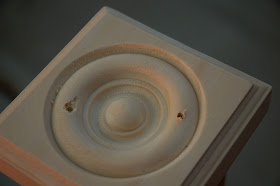
1 1/8" x 4 - 1/2" x 4 - 1/2" Hardwood Rosette
7/8" x 3 - 3/4" x 3 - 3/4" Hardwood Rosette
Hose Hanger
And, you may have on hand already:
Wood Glue
2, 3" screws
2, 2" screws
Spray Paint
Drill Bits - 1/8 & 1/4
Drill
Brad Gun, with 18 gauge, 2" brads
Vice Grips
Sand Paper
Sand Paper
Remove the screw from the bun with vice grips. According to my husband...
"Every woman should own vice grips. They are great for women, because their hands are typically not as strong as mens hands."
I have to say, I agree! Made the job of getting that screw out so much easier!
"Every woman should own vice grips. They are great for women, because their hands are typically not as strong as mens hands."
I have to say, I agree! Made the job of getting that screw out so much easier!
After lightly sanding the wood, glue the larger rosette to the top of the post. Gluing the pieces in place, makes it so they will not slip when you permanently attach it later.
Glue the bun foot to the small rosette. Let them both dry for a while, until they won't move when you drill holes for the screws.
They will not be attached.
Now to make it strong! This extra step is important... Making a hole for the screw to go into, makes it so you not only get it in the right place, but also makes it so the wood has less of a chance of splitting. Drill a long hole with a 1/8 drill bit.
This step will make it look like you know what you are doing... Get out your 1/4 drill bit, and sink it lightly into the hole you just drilled.
This picture shows how doing the counter sink makes it so the top of the screw sinks into the hole, and the wood will lay flat on top of it.
Do the same for the top piece, like this!
Now it's time to glue the two pieces together.
It will look like this.
After gluing, shoot brads up and into the two pieces, joining them together.
Next, attach the hose holder, using the same method you used before. Drilling holes before setting the screws.
Now, it's time to paint or stain.
I have to admit. I didn't think this project up. I saw a few of these on pinterest, and like this one from Shanty 2 Chic the best!
I shared this on Studio 5. Watch the full clip HERE!
Have a Happy and Creative Day!
Risa


